# Common Student Tasks
# Get Started with the Web Platform
**(on this page)**
How to: Log in / Log out
How to: Use your account profile
How to: Set your communication preferences
#### **How to: Log in / Log out**
**Log in**
1. On the ITLL Website at [https://itll.colorado.edu](https://itll.colorado.edu/), start by clicking on the main "Log In" button at the top-right of the screen.
- on **large screens** (laptop and desktop computers): click on the main "Log In" button at the top-right of the screen
- on **small screens** (phones and tablets): tap on the hamburger menu icon (shown by three stacked lines) at the top-right of the screen, and tap on "Log In" at the bottom of the dropdown list
2. If you are not already actively logged into your **CU-managed Microsoft account**, you will be prompted to log into **Microsoft Online**, where you will need to enter your CU email address (IdentiKey + "@colorado.edu") and password.
3. Once you are logged into Microsoft Online, you will be redirected back to the ITLL Website, where you will now be logged in - the button at the top-right will change to a "Log Out" button to indicate that you are currently logged in.
[](https://itll-wiki.colorado.edu/bookstack/uploads/images/gallery/2026-08/czoAi2Xu5o90R5BA-website-home-mobile-log-in-2.png)
**Log out**
1. On the ITLL Website at [https://itll.colorado.edu](https://itll.colorado.edu/), the "Log Out" button will be placed differently based on your device:
- on **large screens** (laptop and desktop computers): click on the "Log Out" button at the top-right of the screen
- on **small screens** (phones and tablets): click on the hamburger menu icon (shown by three stacked lines) at the top-right of the screen, and click on "Log Out" at the bottom of the dropdown list
[](https://itll-wiki.colorado.edu/bookstack/uploads/images/gallery/2026-08/WExLf5mihUlW3rEL-website-home-mobile-logged-in-2.png)
#### **How to: Use your account profile**
Once you are logged into the ITLL Website, you can find your **Profile** using the menu at the top (on desktop screens), or in the mobile hamburger menu (on mobile devices). The Profile is very limited since it keeps track of only a few items - workshops & events that you've signed up for (My Upcoming Workshops), workshops & events that you've previously attended (My Past Workshops), submission requests that you've made in one of multiple categories, and your communication preferences for being notified of events and messages (My Communication Preferences).
Due to the limited number of items that are tracked, no account management features are provided. Any account management you may need to do will be done through your CU-managed Microsoft account.
[](https://itll-wiki.colorado.edu/bookstack/uploads/images/gallery/2026-08/GfW9ZUYcjsrO6gBm-account-using-profile-2a.gif)
#### **How to: Set your communication preferences**
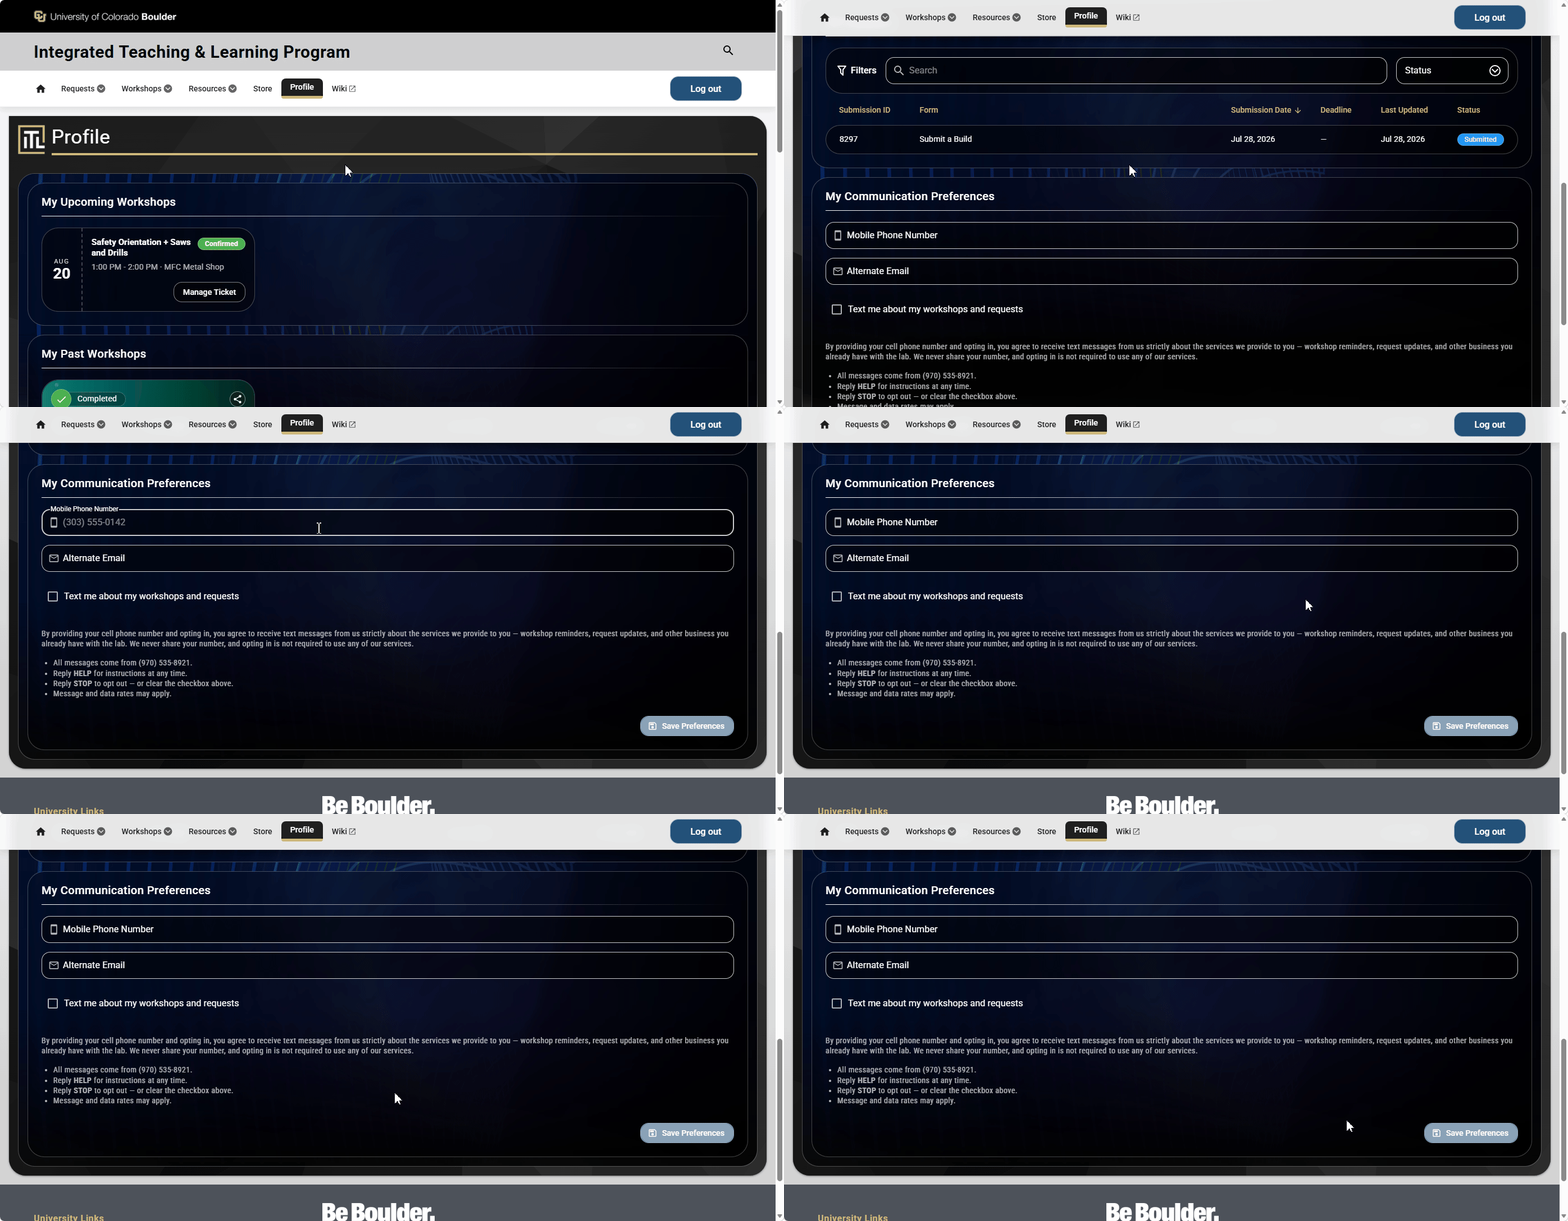
- Enter your **Mobile Phone Number** in the input field to be able to receive text messages of workshop reminders, communications from request submissions, and other website-specific notifications. You will only receive notifications for anything within the ITLL Website.
- Check the box for "Text me about my workshops and requests" if you want to receive these text message notifications; uncheck the box to disable receiving the notifications.
- Enter an **Alternate Email** if you want to receive email notifications at a secondary email address. Otherwise, you will receive all email notifications only at your CU-managed Microsoft account email address (IdentiKey + "@colorado.edu").
[](https://itll-wiki.colorado.edu/bookstack/uploads/images/gallery/2026-08/Z3VGbBYEZdZ3sriF-profile-communication-preferences-3.gif)
# Sign up for Events and Workshops
**(on this page)**
How to: Browse the workshop catalog
How to: Sign up for a workshop
#### **How to: Browse the workshop catalog**
You can browse the Workshops Catalog in either of two ways:
- From the **hero on the homepage**: click/tap on the **Workshops button** in the hero section and you will be taken to the Workshops Catalog
- From the **Workshops menu on the navigation bar or mobile menu**: expand the Workshops menu and click/tap on **Register for Workshops** in the dropdown
Once you are on the Workshops Catalog page, you will be able to **Choose a Category** from the multiple categories that are available (for the ITLL these include: Arduino, CAD, ECAD, Electronics, Manufacturing, Materials Testing, Programming, Prototyping, and Tour).
1. Click/tap on one of the workshop categories at the top under **Choose a Category**.
2. Next, click/tap on one of the workshops available under **Choose a Workshop**. Sometimes there may be a Level 1 through 4 series of a workshop available, in which case the Level 1 workshop may be a prerequisite for the Level 2 workshops or higher.
[](https://itll-wiki.colorado.edu/bookstack/uploads/images/gallery/2026-08/6CiEr3lJ5TmuiAix-events-browse-4b.gif)
#### **How to: Sign up for a workshop**
You may need to sign up and complete the **Tour** in order to attend other specific workshops, such as "Arduino - Wiring & Coding Inputs & Outputs" and "CAD - Operating the 3D Scanners". To find a workshop and sign up for it:
1. Click/tap on one of the workshop categories at the top under **Choose a Category**.
2. Next, click/tap on one of the workshops available under **Choose a Workshop**. Sometimes there may be a Level 1 through 4 series of a workshop available, in which case the Level 1 workshop may be a prerequisite for the Level 2 workshops or higher.
3. Next, click/tap on one of the scheduled workshop times listed under **Pick a Time**.
4. If applicable, a **Workshop Survey** may appear next afterwards. Select your response and provide a text answer if one is expected.
5. Next, click/tap the **Register button** under **Review & Register**. A confirmation modal will pop up, you can click/tap on Close to proceed. You will then be immediately redirected to your **Profile page**, where you will see the workshop that you just registered for listed at the top under **My Upcoming Workshops**.
[](https://itll-wiki.colorado.edu/bookstack/uploads/images/gallery/2026-08/A0QLDbjynUq5wL3J-signup-itll-tour-5a.gif)
- If a workshop has a prerequisite that you haven't yet met, you will see indicator text both within the Description and also in the Review & Register section (which will both list the title of the Prerequisite event), and you will be unable to click/tap on the Register button.
[](https://itll-wiki.colorado.edu/bookstack/uploads/images/gallery/2026-08/Vn53xKpuddme6zRb-signup-prereq-not-met-5c.gif)
# Cancel a Ticket for an Event/Workshop
**(on this page)**
How to: Cancel an event ticket
#### **How to: Cancel an event ticket**
If you can no longer attend a workshop that you signed up for, that is understandable since plans can change. However, if you cannot attend a workshop, please remember to cancel your ticket as it will free up a slot that another student can use.
1. From anywhere on the ITLL Website, click/tap the **Profile menu** in the navigation bar or mobile menu to go to your Profile page.
2. Locate the workshop that you want to cancel under **My Upcoming Workshops**.
3. Click/tap the **Manage Ticket** button.
4. On the next screen, click/tap the **Cancel Registration** button.
5. On the confirmation modal that pops up, click/tap **OK**.
6. The **Cancel Registration** button will change to **Register** in case you want to register again, or you can use the other button to **See Other Sessions**.
[](https://itll-wiki.colorado.edu/bookstack/uploads/images/gallery/2026-08/TKokIpTl7zFZaK0y-workshops-cancel-ticket-6.gif)
# View Upcoming & Past Workshops
**(on this page)**
How to: View my upcoming & past workshops
How to: View workshop completion certificates
How to: Share a workshop completion certificate
#### **How to: View my upcoming & past workshops**
1. From anywhere on the ITLL Website, click/tap the **Profile menu** in the navigation bar or mobile menu to go to your Profile page.
2. Under **My Upcoming Workshops**, you will see all of your upcoming workshops listed.
3. Under **My Past Workshops**, you will see all of your previously attended workshops listed.
4. The cards showing your upcoming and past workshops have very limited interactivity and are primarily shown for future and historical reference, respectively.
[](https://itll-wiki.colorado.edu/bookstack/uploads/images/gallery/2026-08/JEzEZs9imRcq6UMi-workshops-view-upcoming-and-past-7a.gif)
#### **How to: View workshop completion certificates**
Your **workshop completion certificates** are exactly what is shown in your Profile under My Past Workshops, and include a **Completed On** date and **Processed By** to indicate the person that recorded your attendance.
#### **How to: Share a workshop completion certificate**
There may be times when your class professor will ask for proof that you've completed a given workshop. You can provide that proof by sharing your workshop completion certification, which is detailed in the next steps.
1. From anywhere on the ITLL Website, click/tap the **Profile menu** in the navigation bar or mobile menu to go to your Profile page.
2. Under **My Past Workshops**, you will see all of your previously attended workshops listed.
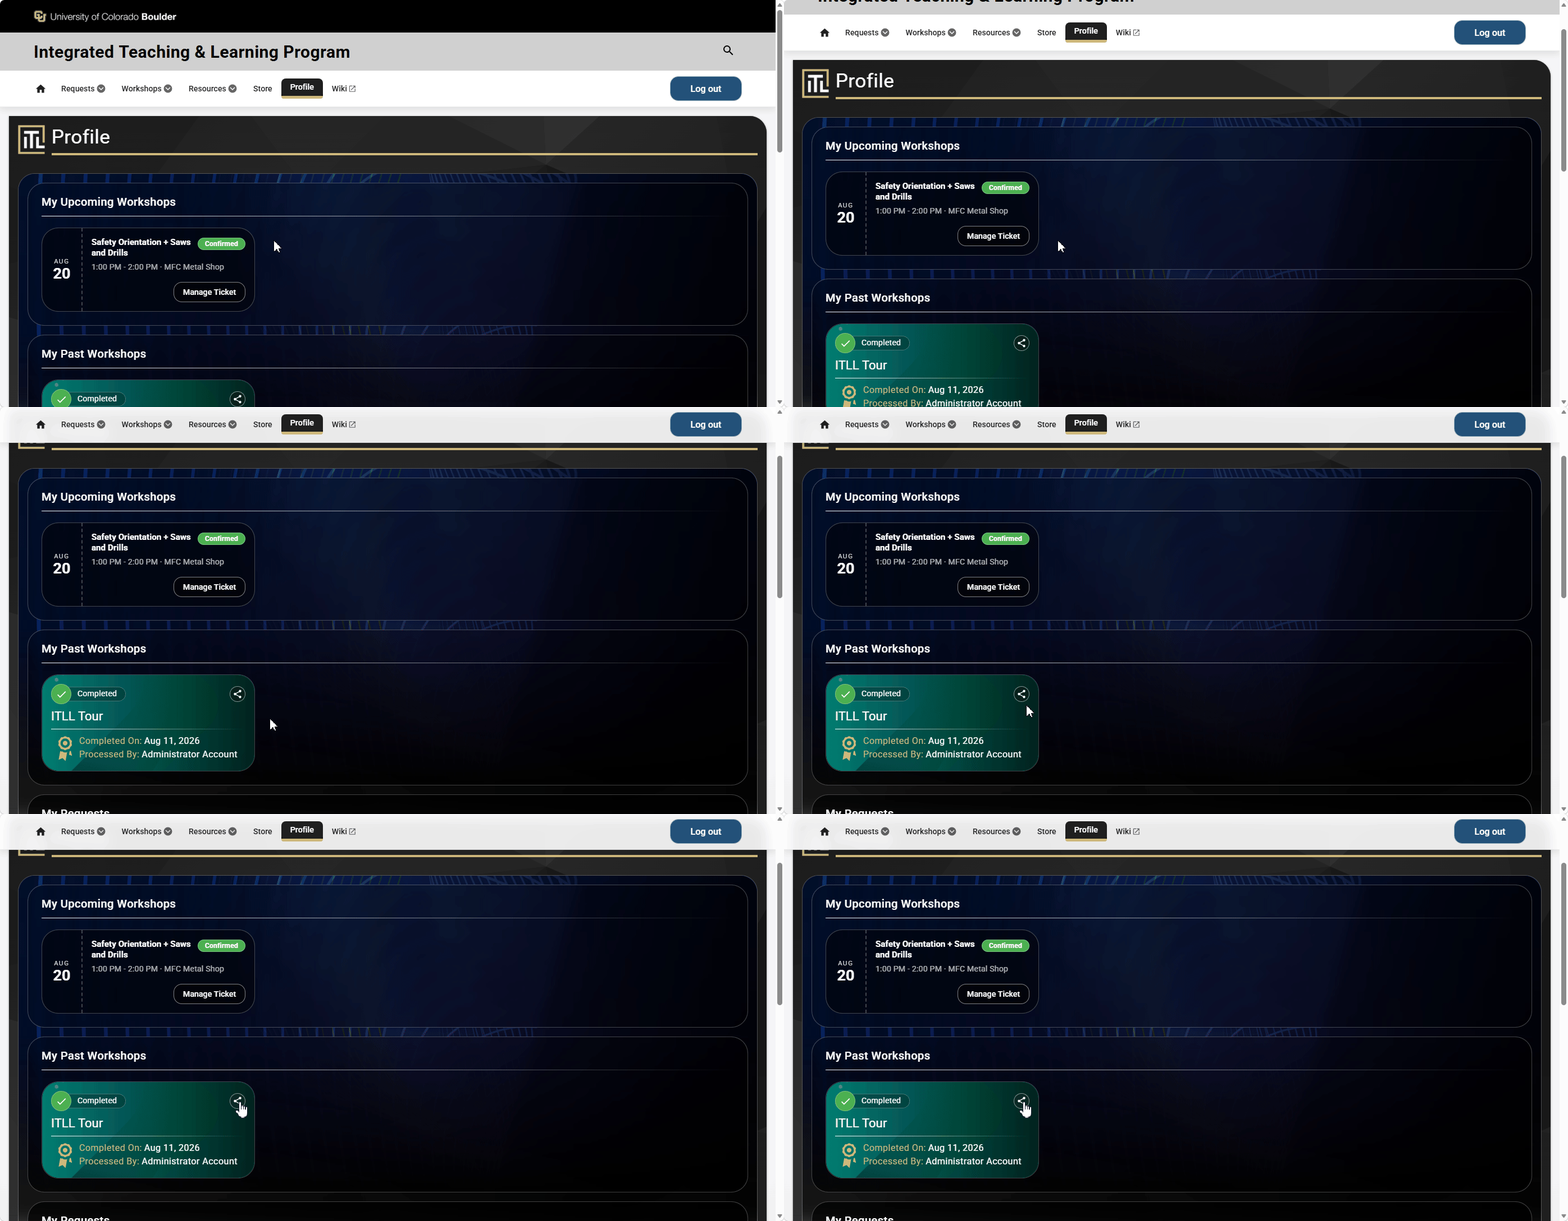
3. Click/tap on the **Share icon** in the top-right corner of the card, which will open a Share link action, where you can select one of the available apps on your device to send the certificate through.
[](https://itll-wiki.colorado.edu/bookstack/uploads/images/gallery/2026-08/NutbcrHobjOGXTW7-workshops-share-certificate-7c.gif)
# Submit a Request
**(on this page)**
**Requests and Request Categories**
**Request Submissions Lifecycle**
How to: Submit a poster print
How to: Submit a 3D print
How to: Respond to request communications
How to: Pay for a request
#### **Requests and Request Categories**
**Requests** are where you can submit forms to make a variety of requests including 3D printing, item fabrication in the Manufacturing Center (such as Printed Circuit Boards), and software licenses. In the ITLL, **Request Categories** and **Forms** include:
- Poster Printing
- form(s): Poster Printing
- 3D Printing
- form(s): PETG 3D Printing, Prusa XL Print, Markforged Onyx Print
- PCB Requests
- form(s): Printed Circuit Board (PCB)
- Manufacturing Center
- form(s): Manufacturing Center Fabrication
- Software License Request
- form(s): Software License Request
#### **Request Submissions Lifecycle**
1. **Submitted**
- status after the request is initially made
2. **Customer Action Needed**
- status after receiving a question from staff or faculty
3. **Under Review**
- status after sending a response to a question, or Resubmitting the form
4. **Payment Pending** (when applicable)
- status when payment should be made
5. **In Process**
- status after payment is made
6. **Completed**
- status when the request is fulfilled
7. **Canceled** (when applicable)
- status after the request is canceled for a particular reason
#### **How to: Submit a poster print**
1. From anywhere on the ITLL Website, click/tap the **Requests menu** in the navigation bar or mobile menu, and then **Make a Request** in the dropdown.
2. Under **Select a Request Category**, click/tap one of the multiple options available. For this example scenario, select **Poster Printing**.
3. Under the next section **Select a Request**, click/tap **Poster Printing**.
4. Continue scrolling down to carefully read the **description** and note any special instructions.
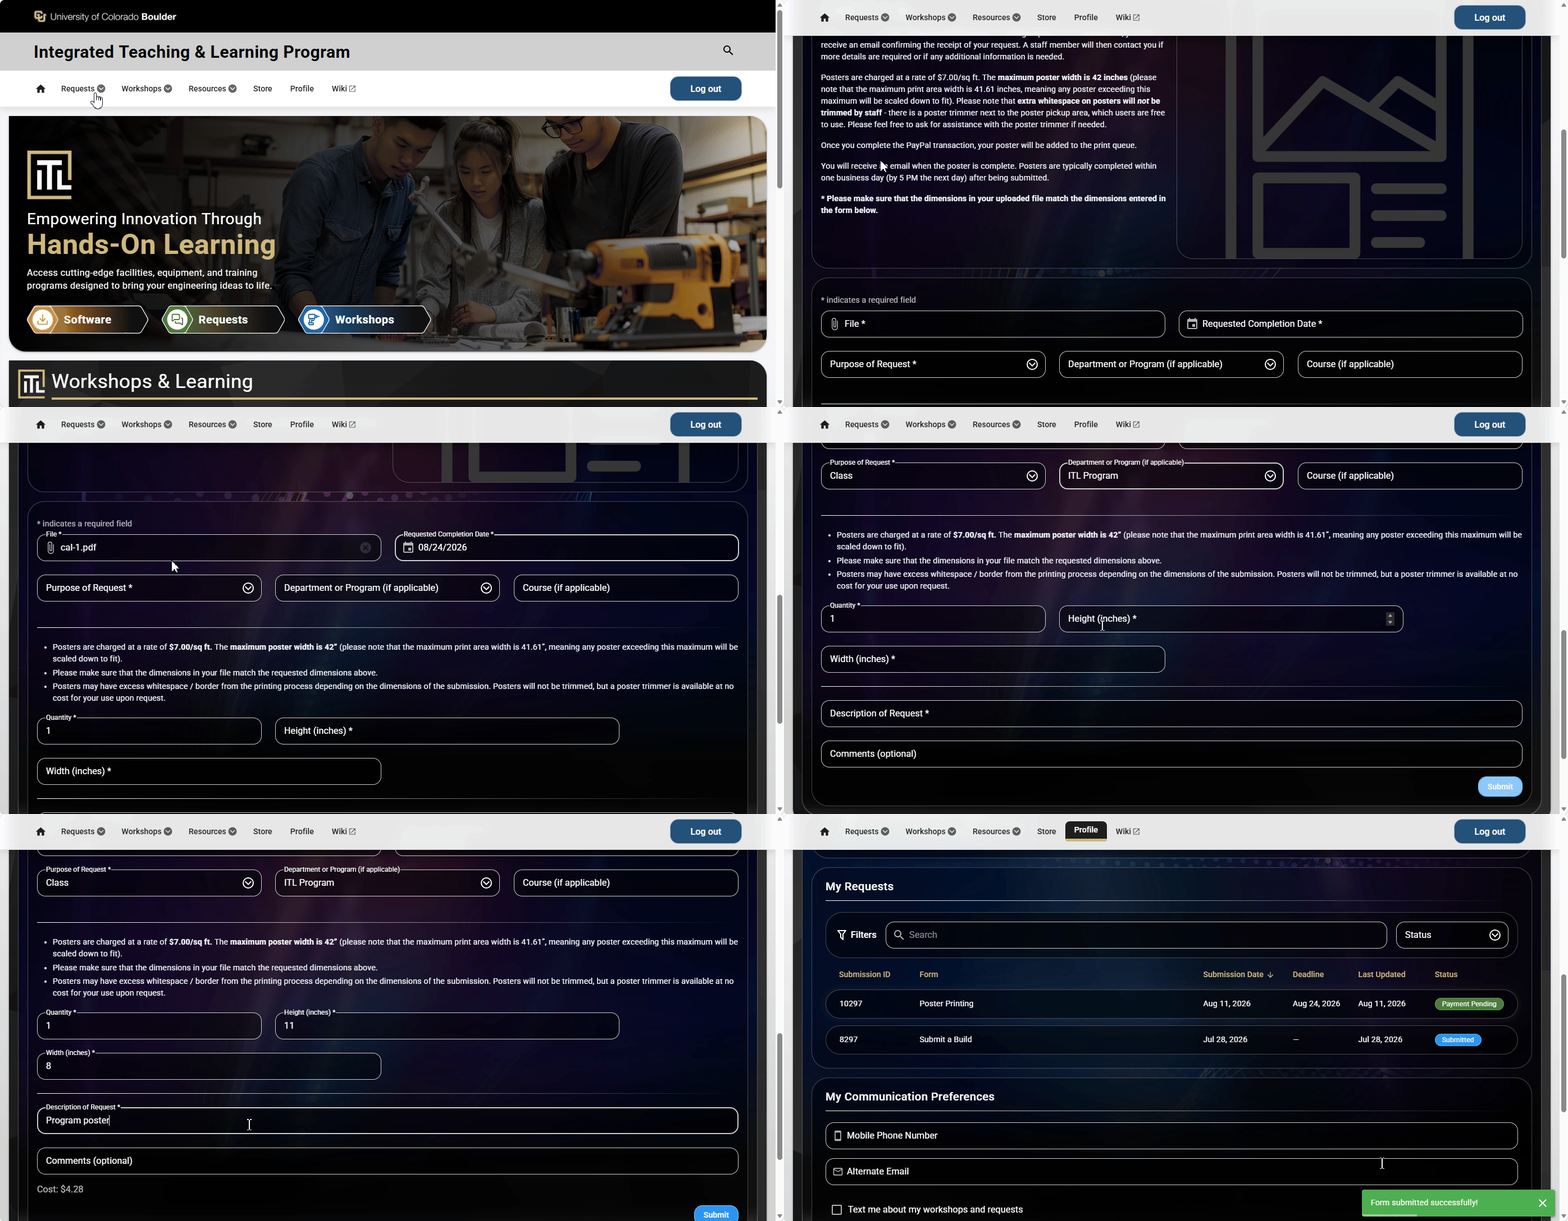
5. Continue scrolling further down to see the **request form** (continuing with the form for Poster Printing for this example):
- Click/tap the **File** input field, and select a file on your device (the file must be in a compatible format such as PDF, JPG, JPEG, or PNG)
- Click/tap the **Requested Completion Date** input field, and select a target date in the future
- Click/tap the **Purpose of Request** input field, and choose one of the three options (Class, Research, or Student Club)
- Click/tap the **Department or Program** input field, and choose an option (an Other option is available if none of the others apply)
- Click/tap the **Course** input field, and enter a course name if applicable
- Click/tap the **Quantity** input field to specify desired quantity (can use the up/down arrow buttons inside the input if needed)
- Click/tap the **Height** and **Width** input fields and specify a numeric quantity for each
- Click/tap the **Description of Request** input field and enter a description of sufficient detail
- Click/tap the **Comments** field to optionally provide any further information
- Click/tap the **Submit** button to submit and proceed
- You will be redirected to the **My Requests** section on your Profile page and will briefly see the newly-created submission highlighted with a glow animation
[](https://itll-wiki.colorado.edu/bookstack/uploads/images/gallery/2026-08/deJRUXws2JNThvgT-requests-poster-print-8a.gif)
#### **How to: Submit a 3D print**
1. From anywhere on the ITLL Website, click/tap the **Requests menu** in the navigation bar or mobile menu, and then **Make a Request** in the dropdown.
2. Under **Select a Request Category**, click/tap one of the multiple options available. For this example scenario, select **3D Printing**.
3. Under the next section **Select a Request**, click/tap **Prusa XL Print**.
4. Continue scrolling down to carefully read the **description** and note any special instructions.
5. Continue scrolling further down to see the **request form** (continuing with the form for Prusa XL Print for this example):
- Click/tap the **Completion Date** input field, and select a target date in the future
- Click/tap the **File** input field, and select a file on your device (the file must be in a compatible format such as STL, ZIP, 3MF, GCODE, or BGCODE)
- Click/tap the **Purpose of Request** input field, and choose one of the three options (Class, Research, or Student Club)
- Click/tap the **Type of Material** input field, and choose one or more options from the dropdown
- Click/tap the **Size**, **Quantity**, and **Comments** input fields to provide relevant information
- Checkmark the "I have consulted with an ITLL staff engineer" box to confirm that you have in fact completed that step
- Click/tap the **Submit** button to submit and proceed
- You will be redirected to the **My Requests** section on your Profile page and will briefly see the newly-created submission highlighted with a glow animation
[](https://itll-wiki.colorado.edu/bookstack/uploads/images/gallery/2026-08/saJ8uKwOC1eDVxJb-requests-3d-print-prusa-xl-8b.gif)
#### **How to: Respond to request communications**
Once you have submitted a request and it appears in your Profile under My Requests with a Status of **Submitted**, you can then click/tap the submission to open it and view its details at anytime.
1. After you submit a request, you can expect to receive communication from a staff member at anytime. As soon as communication is sent by a staff member, you will receive a notification according to the Communication Preferences that are set on your Profile page (default notification is an email to your CU-managed email address).
- Notification emails will always contain a "View Submission" link to the submission for quick reference, and also include the **form name** and **submission ID number**, so you can use that information to locate the submission in your history under **My Requests**
2. When you receive your first communication from a staff member, the status of the submission will change - this will typically be **Customer Action Needed**, but you may see another status displayed instead.
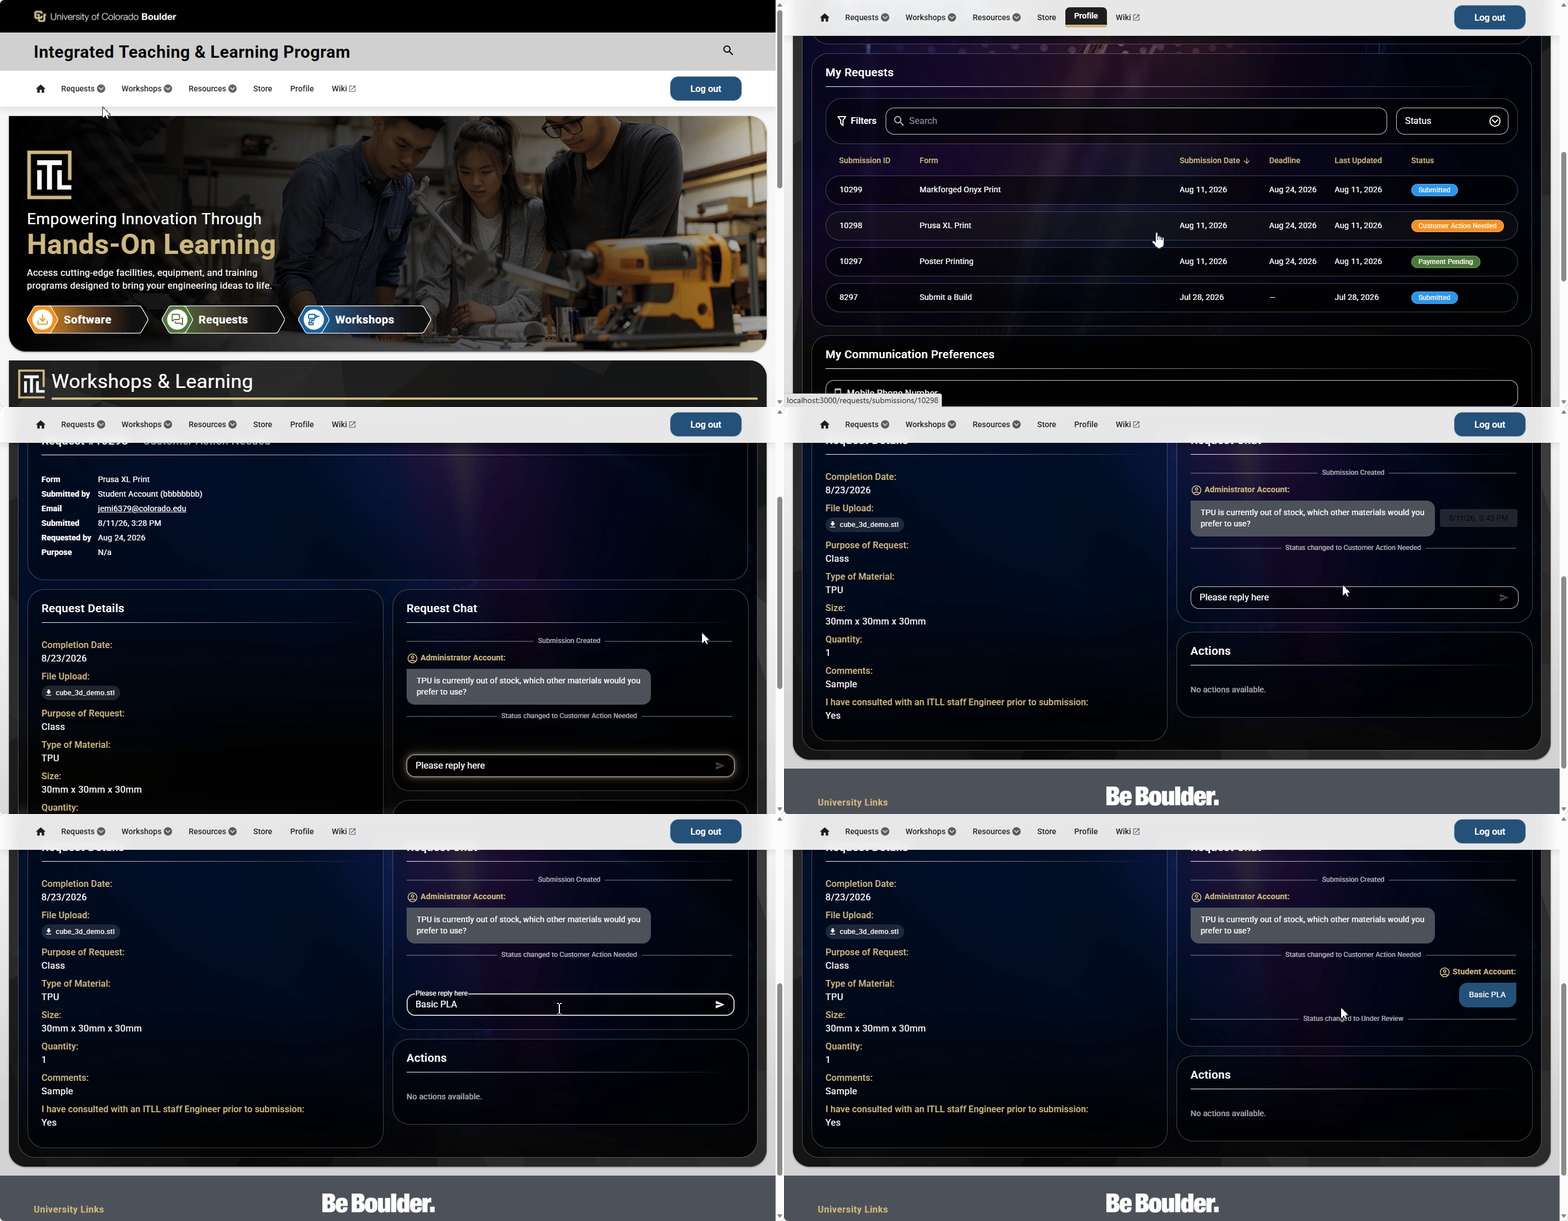
3. To respond to staff communication when the submission has a status of **Customer Action Needed**, click/tap on your submission (or open it from an email) to view it in Details mode.
4. Scroll down to find both the **Request Chat** and **Actions** sections.
5. In the Request Chat section, you can provide your response as needed (method of input will vary depending on the type of question, and may be either a text input field or yes/no buttons).
6. You might or might not receive additional staff communication, so continue to monitor your emails (or text messages) as appropriate. Every time a new communication is sent by you or received from staff, you will see the activity recorded in the Actions section.
7. When you receive a notification that the submission is **In Process**, you will no longer need to answer questions and can expect to stand by and wait until you receive another notification that the submission is **Complete**.
8. When you receive a notification that the submission is Complete, you should expect to receive details on **Pickup** soon afterwards.
[](https://itll-wiki.colorado.edu/bookstack/uploads/images/gallery/2026-08/x27YULKcpZueHkDj-requests-comm-reponding-8c.gif)
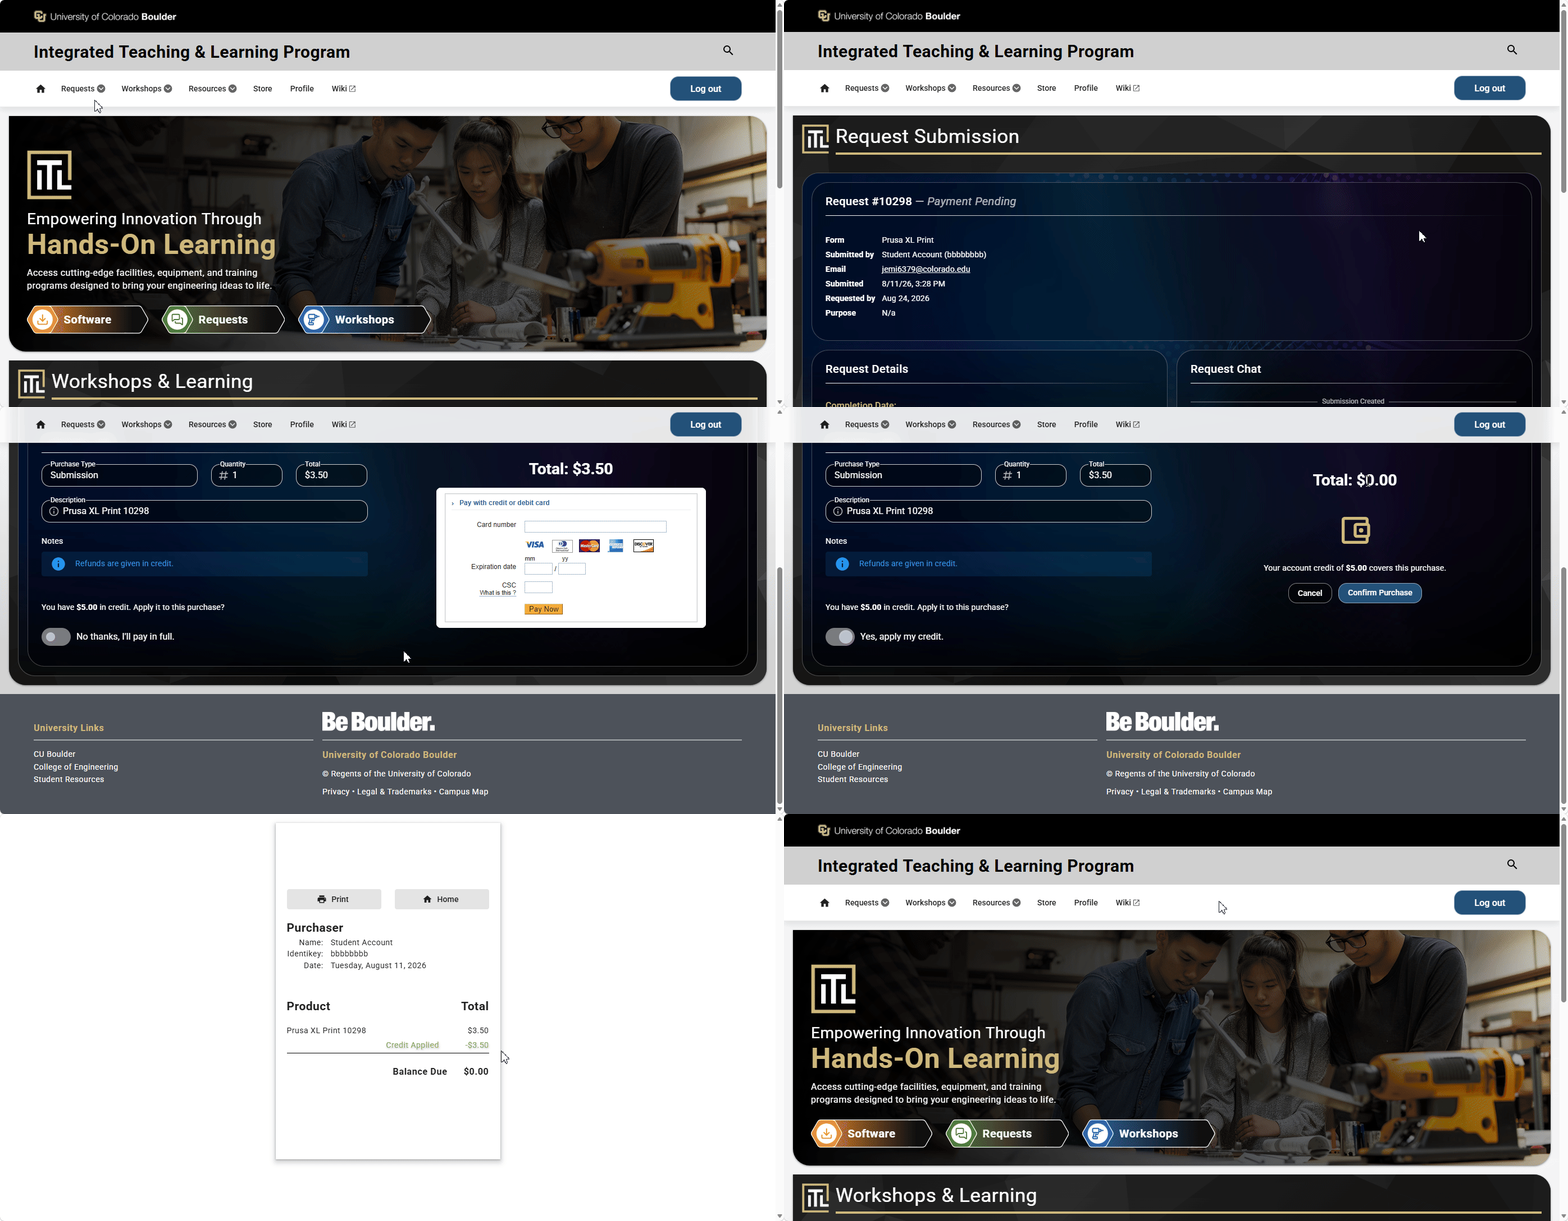
#### **How to: Pay for a request**
After you have submitted a request, you may receive a notification to provide payment, and the submission will have a status of **Payment Pending**. To pay for the submission:
1. Click/tap on your submission from the **My Requests** section in your Profile (or alternately open it from the View Submission link within a notification email).
2. Scroll down to find the **Actions** section, where you will see a **Proceed to Payment** button.
3. On the next screen, your Name and Email will be prefilled, along with the Purchase Info.
4. If you have credit on your individual balance, you can either opt to have it applied to the purchase, or pay the total amount with a credit or debit card, using the toggle switch. If your balance completely covers the purchase, you will see a **Confirm Purchase** button instead of a credit/debit card payment form.
5. Enter your credit or debit card info into the payment form (if applicable), then click the **Pay Now** button.
6. You will be redirected to a screen containing a confirmation receipt, which you can save for your records.
7. Click the **Home** button on the screen to return to the ITLL Website homepage.
8. If you purchased an item that requires a pickup, stand by and wait to receive a notification email when the item is ready for pickup, which will provide information on where to pick the item up.
[](https://itll-wiki.colorado.edu/bookstack/uploads/images/gallery/2026-08/89xOJgADZ5NuialC-requests-pay-8d.gif)
# View Request Status
**(on this page)**
How to: Use the request filters
#### **How to: Use the request filters**
1. In the **submissions table** in your **My Requests section** on your Profile page, you can filter the table to find specific submissions that you want to view by **ID number** or **Form name** (both of which are provided in a notification email that you receive from itl-noreply@colorado.edu).
- By default, the table lists all submissions by Submission Date in reverse-chronological order. You can optionally click/tap any of the column headers (Submission ID, Form, Submission Date, Deadline, Last Updated, or Status) to sort by that column header instead. You can click a column header again to sort it in reverse order.
- You can filter the table using the **Search** input field at the top of the table. The Search input field will accept and search by an ID or Form name.
- You can also use the **Status** dropdown list (at the far-right end of the Search input field) to optionally filter by any of the available Status values, which include:
- Submitted
- Under Review
- Accepted
- Quoted
- Payment Pending
- Payment Complete
- In Process
- Delayed
- Ready for Pickup
- Completed
- Canceled
[](https://itll-wiki.colorado.edu/bookstack/uploads/images/gallery/2026-08/MZCaAuTQmf0xIW8J-requests-filters-9a.gif)
# Purchase Items in the Store
**(on this page)**
How to: Buy a part or supply
How to: Buy 3D Printer OS Balance
#### **How to: Buy a part or supply**
From anywhere on the ITLL Website, click/tap on **Store** in the menu navigation bar (or mobile menu).
1. Find the item that you want to buy, and click/tap on its card (for example, Acrylic Sheet).
- Every item in the store has a **Cancel** button to go back to the main Store page if you happen to mis-click on the wrong item
2. Provide values for all input fields as appropriate (set desired quantity in the case of Acrylic Sheet), then click/tap on the **To Checkout** button.
3. On the next screen, your Name and Email will be prefilled, along with the Purchase Info. Verify that all information is correct.
4. If you have credit on your individual balance, using the toggle switch you can either opt to have it applied to the purchase, or pay the total amount with a credit or debit card.
- If your balance completely covers the purchase, you will see a **Confirm Purchase** button instead of a credit/debit card payment form.
5. Enter your credit or debit card info into the payment form (if applicable), then click the **Pay Now** button.
6. You will be redirected to a screen containing a confirmation receipt, which you can save for your records.
7. Click the **Home** button on the screen to return to the ITLL Website.
8. If you purchased an item that requires a pickup, please stand by and wait to receive a notification email when the item is ready for pickup. The notification email will provide information on the location to pick the item up from.
[](https://itll-wiki.colorado.edu/bookstack/uploads/images/gallery/2026-08/pHi6jYlR7YlI5AOP-store-buy-acrylic-10a.gif)
#### **How to: Buy 3D Printer OS Balance**
[3D Printer OS](https://www.3dprinteros.com/) is the name of an application that allows you to send print requests to 3D printers in the ITLL (such as the Prusa XL) through the [cloud](https://azure.microsoft.com/en-us/resources/cloud-computing-dictionary/what-is-the-cloud), and has a respective item in the Store called 3D Printer OS Balance. You can set your own individual balance for these print requests by purchasing this item whenever you need new or additional funds.
1. Find **3D Printer OS Balance** in the Store, and click/tap on its card.
- If you accidentally clicked on another item, you can go back to the main Store page by clicking/tapping on the **Cancel** button by the **To Checkout** button.
2. Provide a desired amount in the **Price** input field, and text for the **Description** input field (Description text will primarily be for your own reference, so it may be helpful to add a self-memo). Then click/tap on the **To Checkout** button.
3. On the next screen, your Name and Email will be prefilled, along with the Purchase Info. Verify that all information is correct.
4. If you have credit on your individual balance, using the toggle switch you can either opt to have it applied to the purchase, or pay the total amount with a credit or debit card. If your balance completely covers the purchase, you will see a **Confirm Purchase** button instead of a credit/debit card payment form.
5. Enter your credit or debit card info into the payment form (if applicable), then click the **Pay Now** button.
6. You will be redirected to a screen containing a confirmation receipt, which you can save for your records.
7. Click the **Home** button on the screen to return to the ITLL Website.
8. Your balance in the 3D Printer OS software will be updated after the purchase.
[](https://itll-wiki.colorado.edu/bookstack/uploads/images/gallery/2026-08/1GFzgV1X20uvQDjP-store-buy-3dpos-10b.gif)